Data Import Guide
Understanding the two import options and their expected formats.
Import Options Overview
| Import CSV Trades | Import Trade Cache File | |
|---|---|---|
| Source | CSV exported from your broker | JSON file exported from this app |
| Format | Broker-specific CSV or XLSX | App's internal JSON format |
| Use case | First-time import of historical trades | Restoring a backup / syncing between devices |
| Deduplication | By trade_id (merges with existing) | Replaces entire cache for the account |
Import CSV Trades
Use this to import your trade history from a broker's CSV export. The app auto-detects the broker format.
Supported Formats
The app accepts .csv, .xlsx, and .xls files. Format is auto-detected based on file content.
The walkthroughs below cover mStock (both of its exports), Groww, INDmoney and Fyers for Indian equity, and Vested, INDmoney, Morgan Stanley at Work and Fidelity for US stocks.
mStock (Mirae Asset) XLSX Format
Export from: mStock app or website → Trade History report. The file is in .xlsx (Excel) format.
Expected columns:
Trade Date | Exchange | Buy / Sell | Scrip / Contract | Qty | Price | Trade Id
Example rows:
02-04-2026  NSEEQ  Buy  NATCOPHARM-EQ  77  1016.05  405081515
19-03-2026  NSEEQ  Buy  HDFCBANK-EQ    9   801.00  204639352
How to export from mStock (step by step):
- Sign in to mStock on the web and open the menu, the three lines at the left-hand end of the top bar.

- Choose Trade History, under Intelligent Reports.
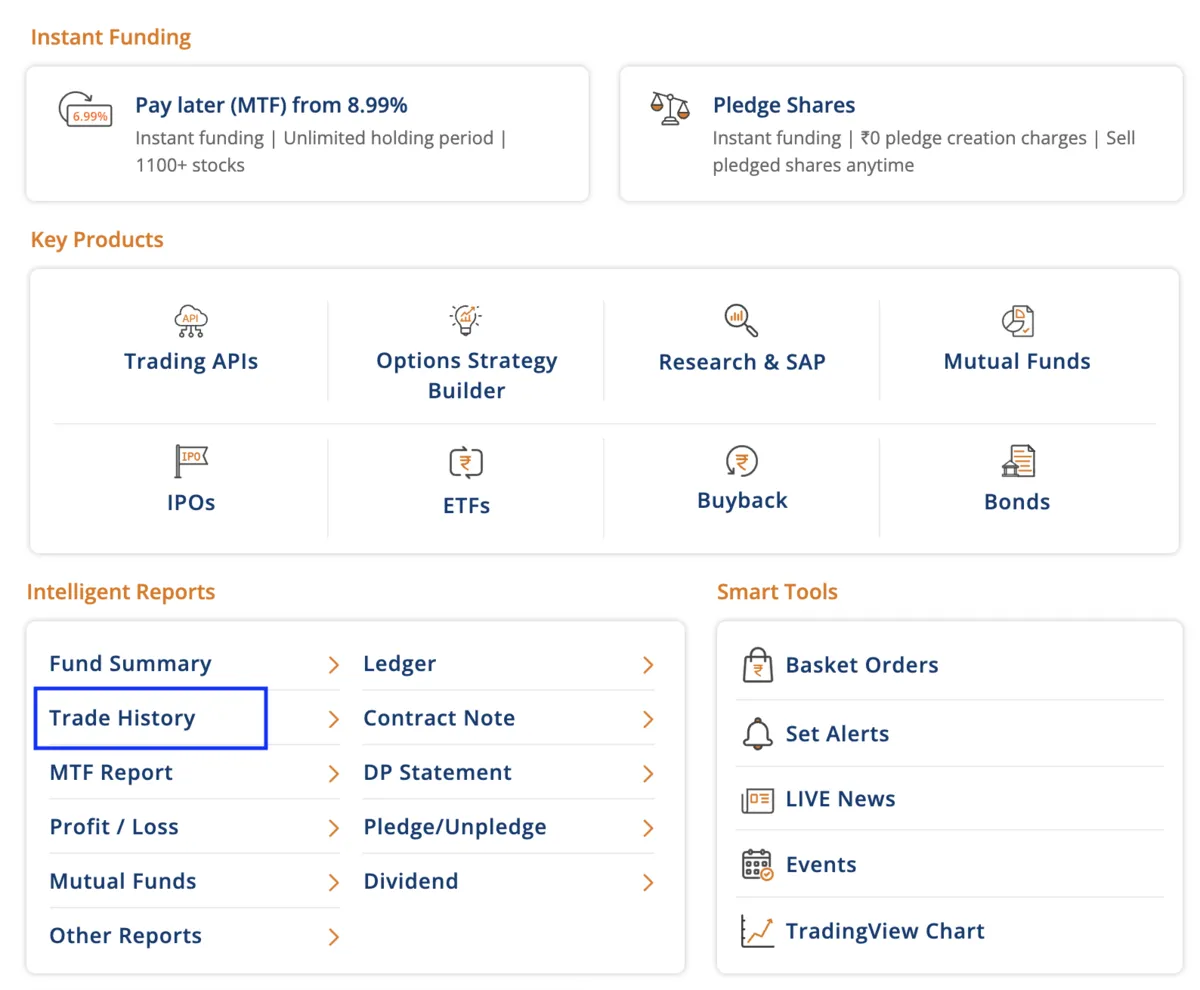
- Pick the period. mStock offers Current F.Y. and Previous F.Y., so two financial years is the most it will export — take each of them in turn, or set a Custom range inside them.

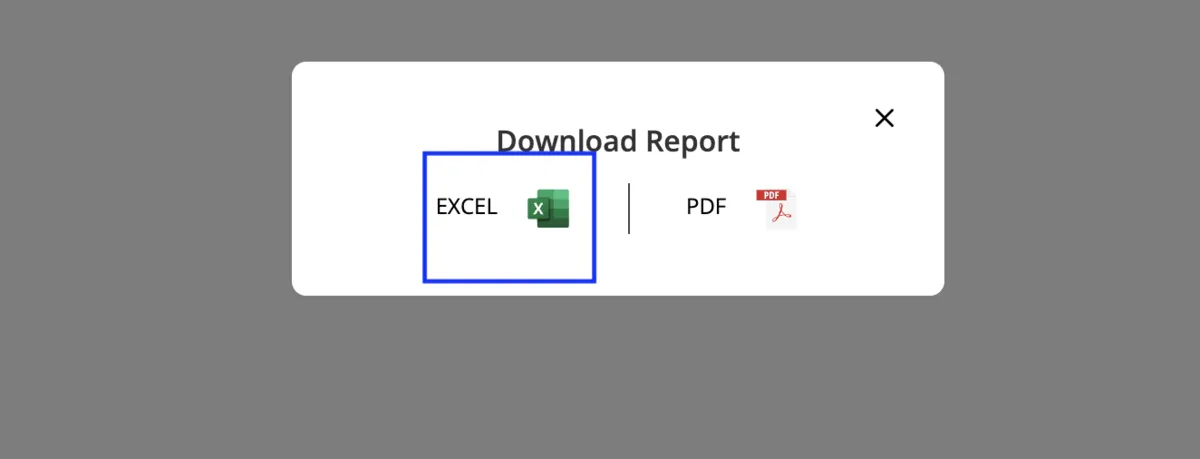
- Click Download.

- Choose EXCEL. Download both financial years, then select them together when you import.
File details:
- The XLSX file contains metadata rows (company info, client details) at the top — the app skips these automatically
- Only the data rows below the "Trade Date" header are parsed
- Footer "NOTE:" rows are skipped automatically
- Both Buy and Sell trades are imported
.xlsx file directly — the app handles Excel format natively. No need to convert to CSV first.
Only two financial years are available on this screen. Anything older comes from a different mStock export — the Sauda Summary Report, which is requested by email rather than downloaded. See mStock Sauda Summary Report below for the request and for what arrives.
mStock Sauda Summary Report (CSV)
mStock's second export, and the only record it will hand out for a financial year older than the two Trade History reaches. It is not a download: mStock support email it to you, one .csv per financial year. The app reads that report.
How to request it from mStock (step by step):
- Email help@mstock.com from the address registered on your mStock account. mStock sends this report to the account holder's registered address and to nowhere else, so a request from any other address will not produce it.
- Ask for the complete transaction report of your account, and say which financial years you need. The years worth asking for are the ones Trade History cannot reach — anything before the current and previous financial year.
- Wait for the reply. This is not a download: someone at mStock answers the request, so allow a few days rather than expecting a file straight away.
- What comes back is the Sauda Summary Report, one CSV per financial year. Save every attachment as it arrives — there is no need to open or convert them first — then select them all together when you import.
No screenshots here, and none are missing. This report is on no screen in mStock's web app: there is no menu item, no reports page and no Download button that produces it. It is requested by email and it arrives by email, so there is nothing to capture. Every other walkthrough on this page is illustrated because it is a click path — this one is a request.
Keep the files. They are the only copy of that history mStock hands out.
Which of mStock's two exports to use. Trade History for the two financial years it covers — the current and the previous one — where it is the better record: one row per fill, with the time of day and mStock's own Trade Id. For anything older, this report is not the weaker of two options; it is the only record mStock will supply.
File details:
- A day's dealing arrives as one line per stock and side. Where you bought or sold the same stock in several fills on one day, this report gives the day's total quantity and its average price as a single row — so a day of seven sells imports as one trade rather than seven, and the times of day are not in the file at all
- Brokerage, taxes and the other charges are not imported. The file does carry a charges column, and the app reads it only to check that each row's own quantity, amount and rate agree, then discards it. The price imported is the gross rate you dealt at rather than the net rate after charges — which is what every other import records, and what your contract note shows
- Files may be imported more than once, and may overlap Trade History. A transaction the account already holds is not added a second time
- Where a year from this report covers a period your Trade History covers only partly, the day's total from this report is what the account keeps: the share count comes out right, and that day's per-fill detail is replaced by the single line
Groww XLSX Format
Export from: Groww → Reports → Stocks - Order history. The file is in .xlsx (Excel) format.
Expected columns:
Stock name | Symbol | ISIN | Type | Quantity | Value | Exchange | Exchange Order Id | Execution date and time | Order status
How to export from Groww (step by step):
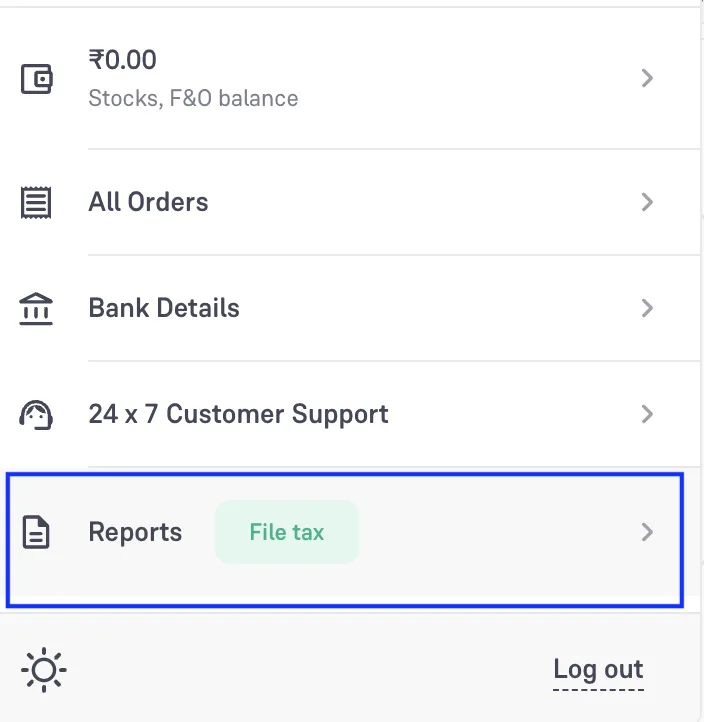
- Sign in to Groww on the web and click your profile, the circle at the right-hand end of the top bar.

- Choose Reports.
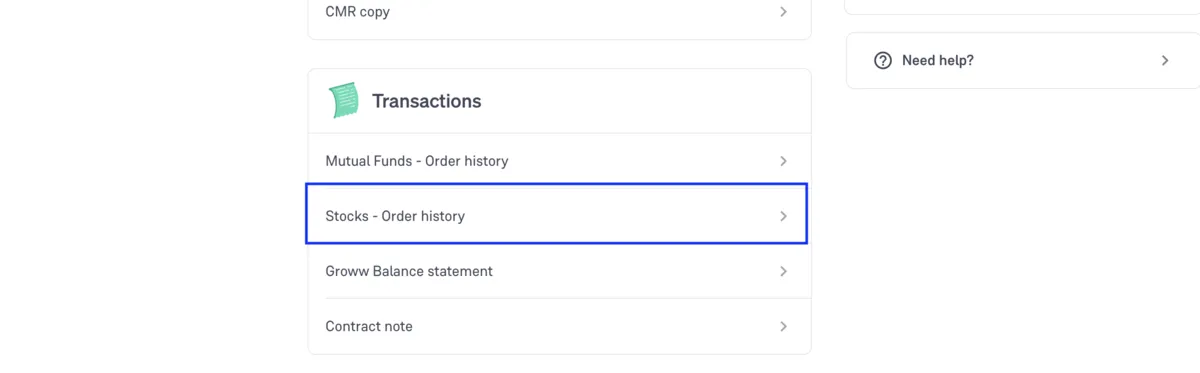
- Scroll down to Transactions and choose Stocks - Order history. Take that one rather than Mutual Funds - Order history.
- Set From and To to cover your whole history, then click Download. The workbook opens with a line reading "Order history for stocks from" and the range you asked for.
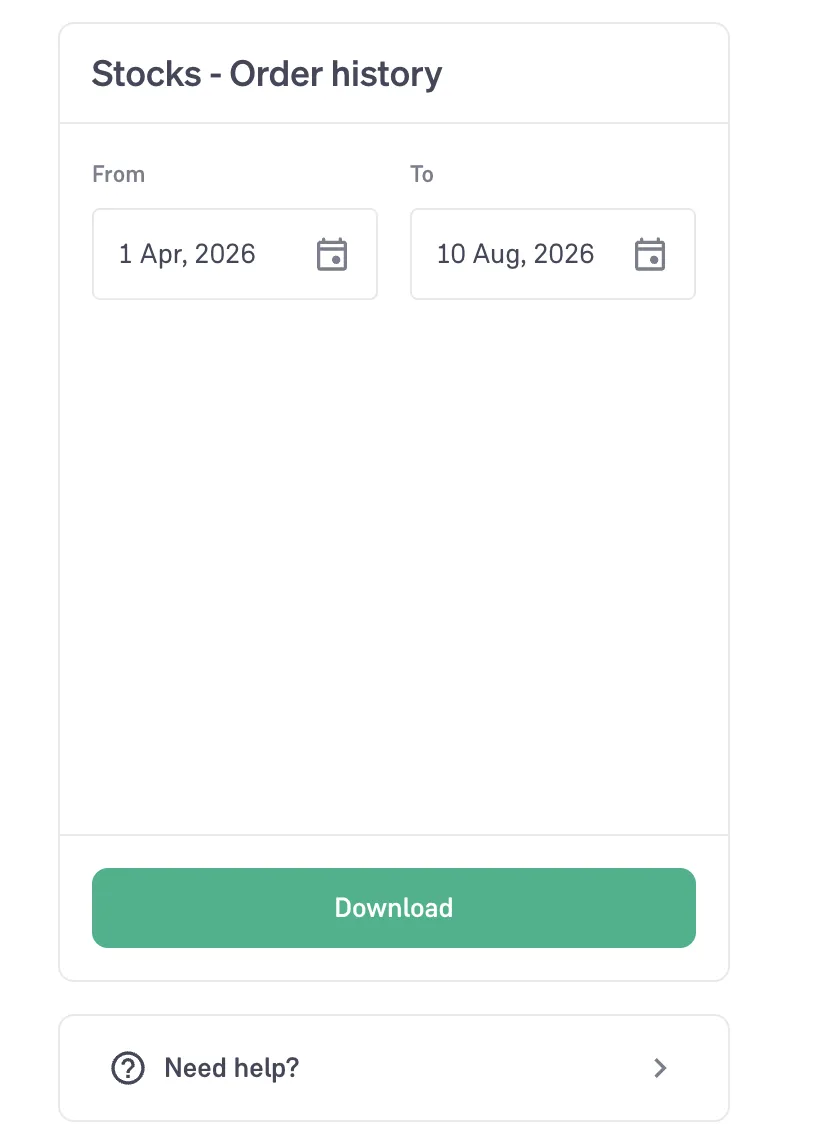
File details:
- The workbook opens with a line reading
Order history for stocks from <date> to <date>— that is how the app recognises it Valueis the total order value; the app divides it by quantity to get the price per share, so that column has to be present- Only rows whose
Order statusis Executed are imported — cancelled, rejected and pending orders moved no shares - Groww exports one arbitrary date range rather than fixed periods, so a single file can cover everything
INDmoney XLSX Format (Indian equity)
Export from: INDmoney → your profile → Tax and Other reports → Download Report → Other Reports → INDstocks → Transaction Statement. The file is an Excel workbook, .xlsx or .xls.
How to export from INDmoney (step by step):
- Sign in to INDmoney and click your profile. On the web it sits at the bottom of the left sidebar.

- Go to Tax and Other reports.
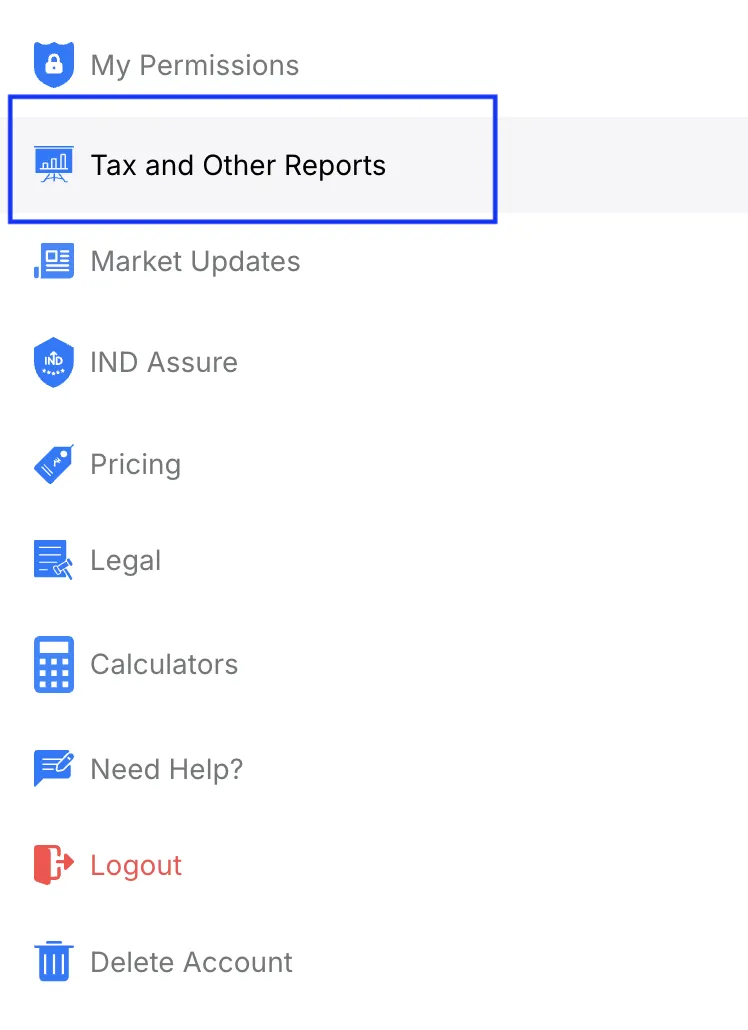
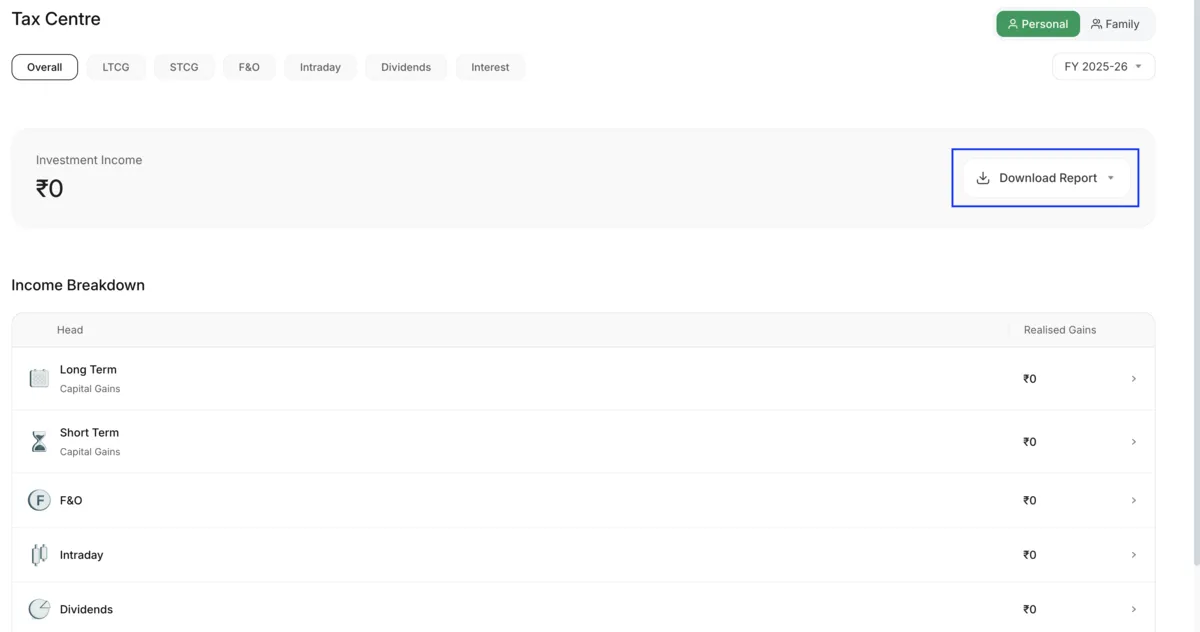
- Click Download Report.
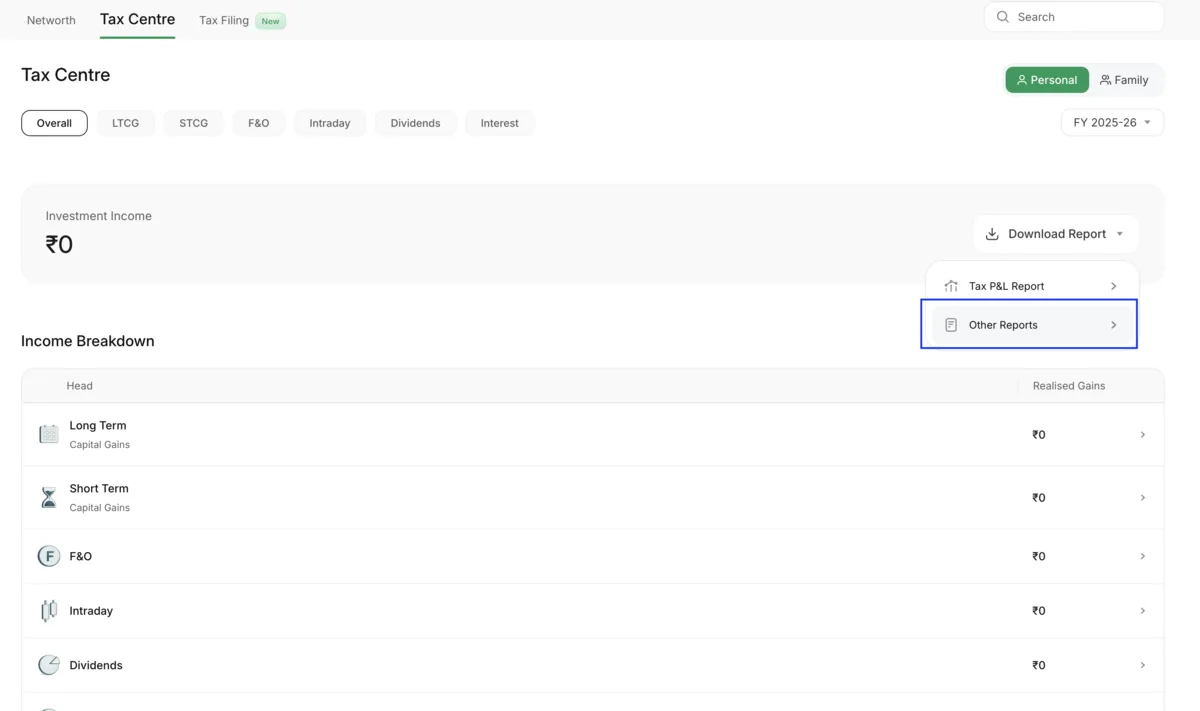
- Choose Other Reports from the dropdown.
- Choose INDstocks. INDmoney reports Indian equity and US stocks separately, so take this one rather than US Stocks.
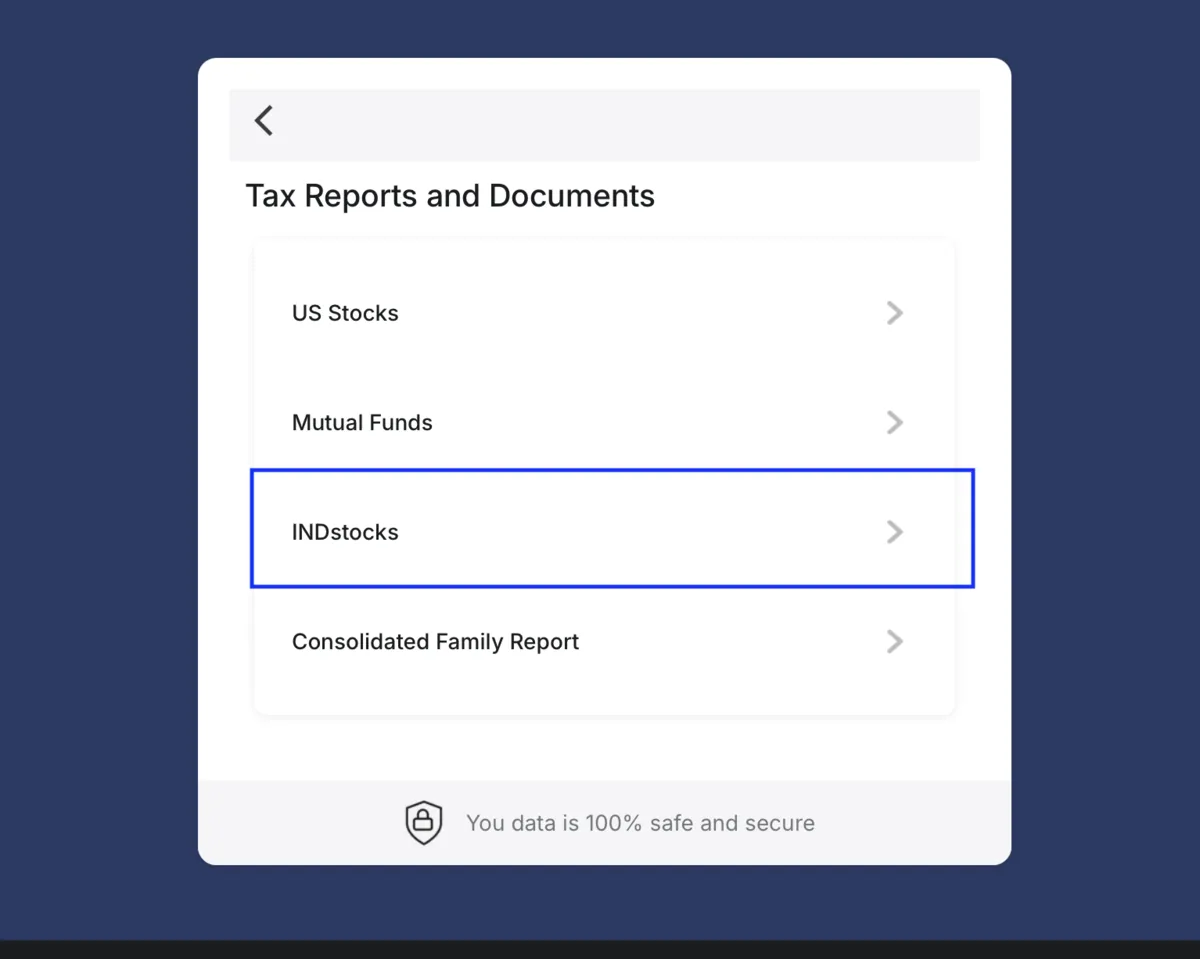
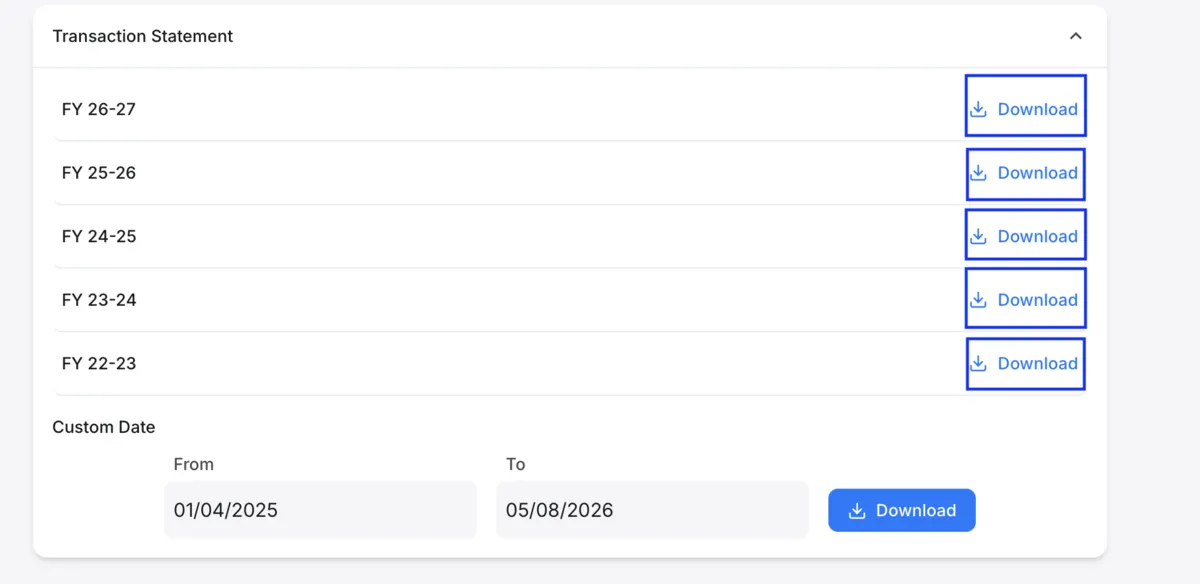
- Scroll to Transaction Statement at the bottom of the page, and download each financial year you have transactions in, then select them all together when you import.
File details:
- Only the
Equity transactions reportsheet is read — that is the sheet name inside the workbook, not the menu wording, which is Transaction Statement - The
FNOsheet beside it is ignored, so futures and options trades do not import - Only rows whose
Order Statusis Executed are imported — cancelled and rejected orders moved no shares - Import the workbook as it downloads — no need to convert it to CSV first
One file per financial year. The statement comes one financial year at a time, so download each year you traded in — you can then select them all together when you import. Start from the year of your first buy, since a sale cannot be matched to a purchase that is not in the files.
Import the empty years too. A year you made no trades in still exports a statement, and importing it is harmless — an empty statement is not a failed export.
Years may be imported more than once. A transaction the account already holds is not added a second time, so fetching the current year again after a few more trades is safe.
Fyers CSV Format
Export from: Fyers Web → Reports → Order Book. Fyers generates it one financial year at a time, back to FY 2019-2020.
How to export from Fyers (step by step):
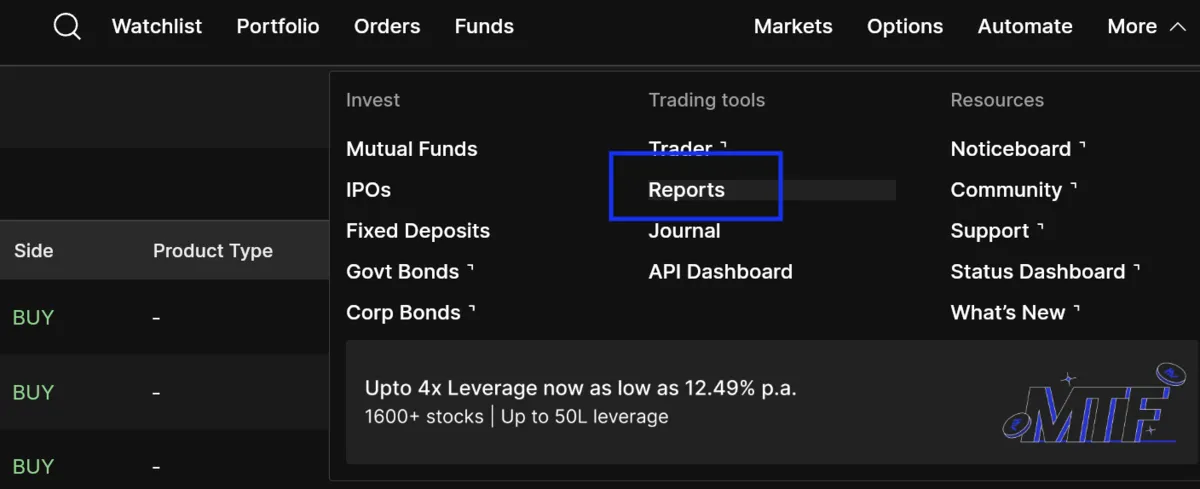
- Sign in to Fyers on the web and click More, at the right-hand end of the top bar.

- Choose Reports, under Trading tools.
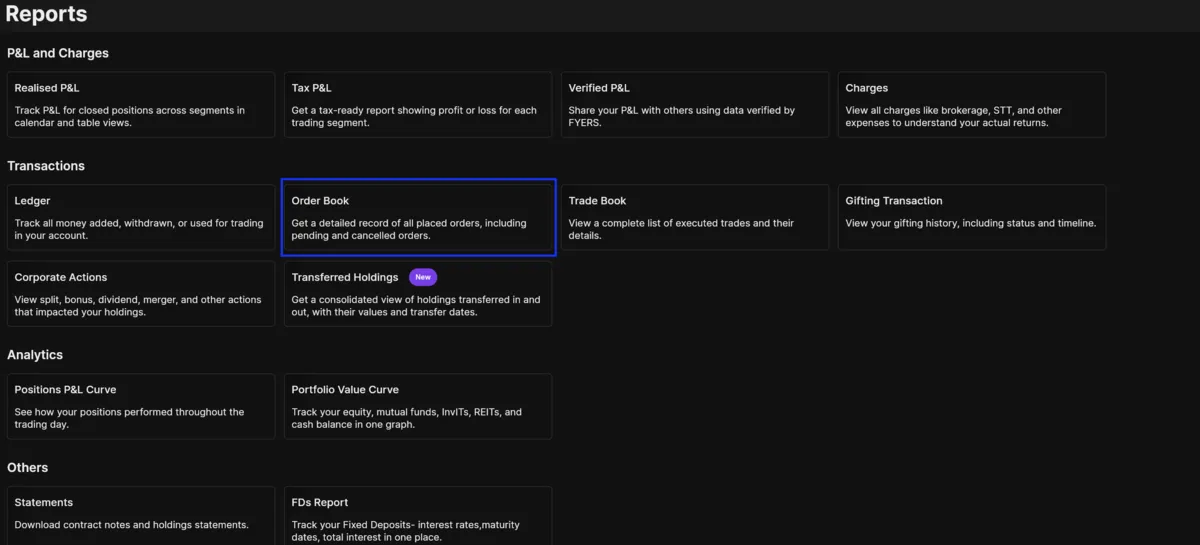
- Choose Order Book, under Transactions — not Trade Book. The Order Book names the stock you traded, where the Trade Book gives only the company name, which the app cannot match to a holding. Orders in it that were cancelled or never filled are skipped for you on import.
- Switch the view from Calendar to Table.
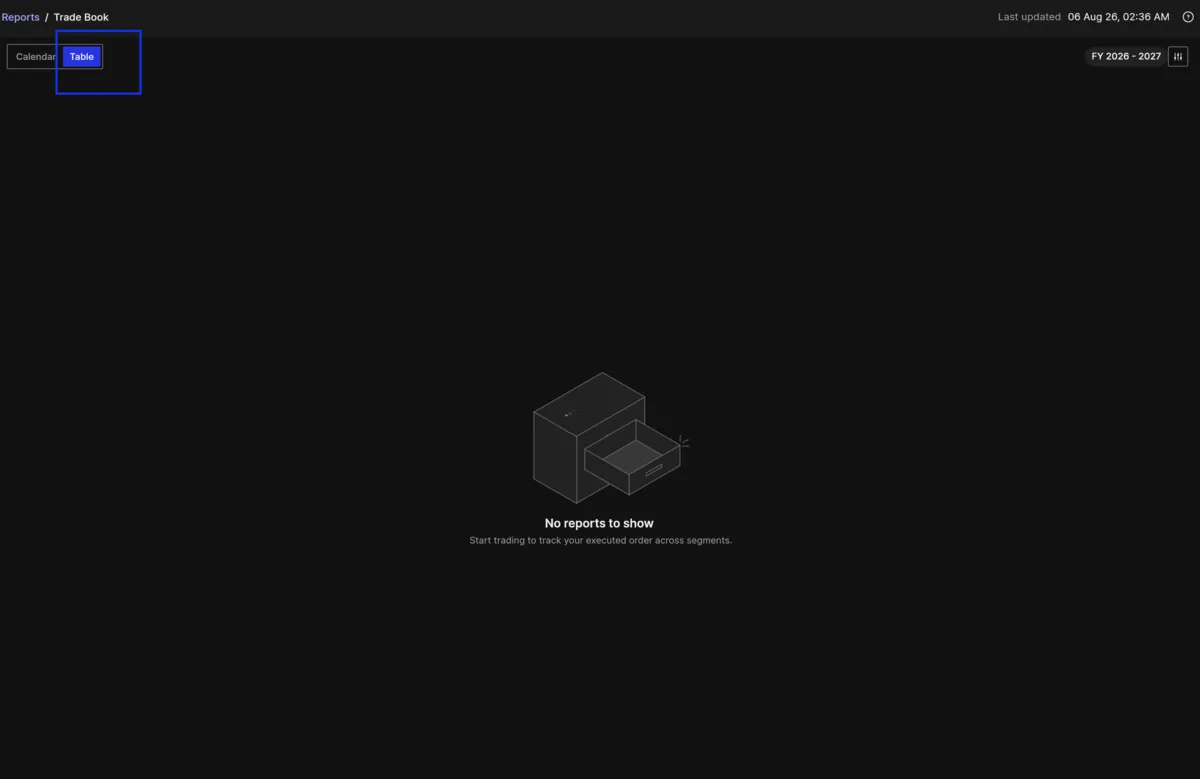
- Open Preferences, the sliders button beside the financial-year pill at the top right.
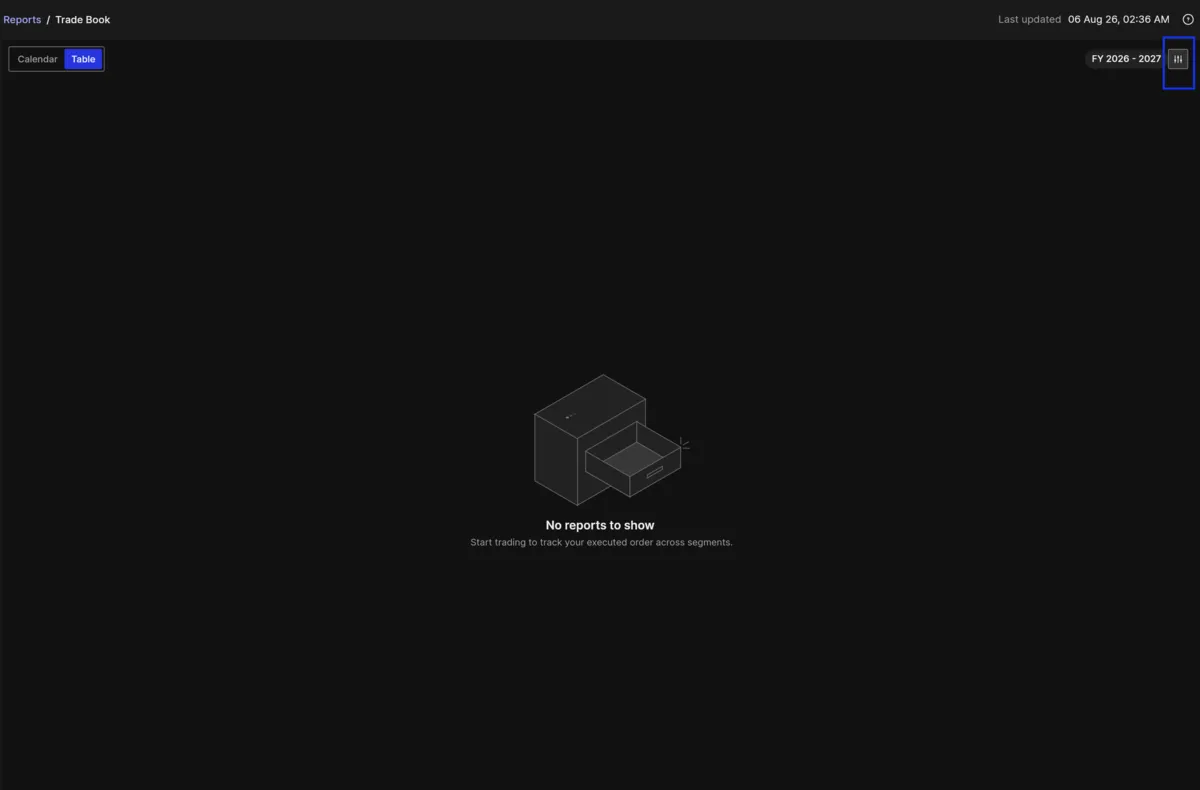
- On the Date Range tab, choose a financial year and click Generate. Fyers lists them one at a time, back to FY 2019-2020, with a Custom Range at the bottom.
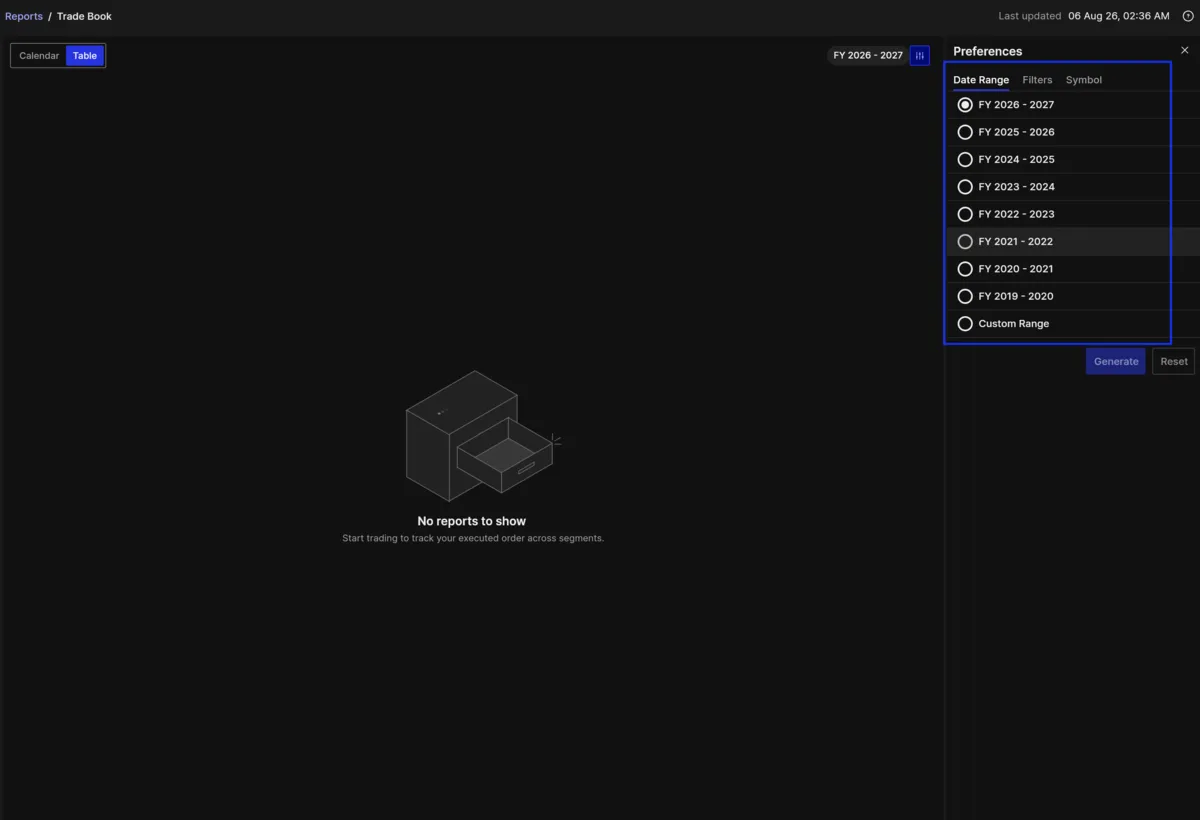
- Click Download, in the toolbar to the left of the financial-year pill.

- Choose CSV and confirm. Repeat for every financial year you traded in, then select them all together when you import.
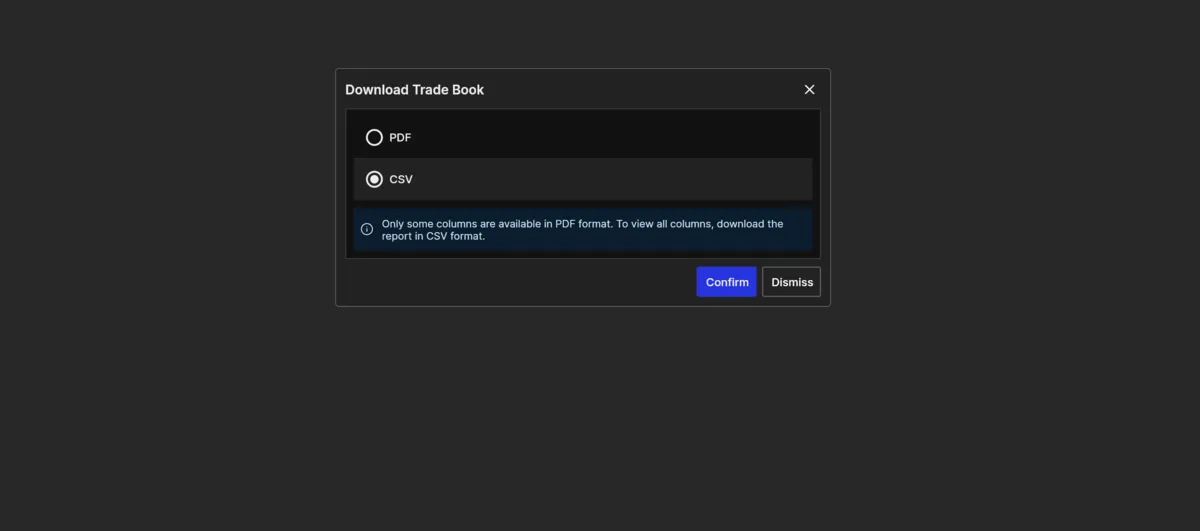
Some of these screens show Trade Book in the breadcrumb or in the download dialog: they were captured along that path, and every control they show is the same one the Order Book has. Choose Order Book at step 3 and the rest of the path is identical.
Choose CSV, not PDF. Fyers says so on the download dialog itself: only some columns are available in the PDF, and the ones it drops are the ones an import needs.
One file per financial year. To import your full history, download each year you traded in — starting with the year of your first buy, since a sale cannot be matched to a purchase that is not in the files:
FY 2023 - 2024FY 2024 - 2025FY 2025 - 2026FY 2026 - 2027
The app merges trades automatically — a transaction the account already holds is not added a second time, so overlapping ranges and re-imported years are safe.
Order Book, not Trade Book. The Trade Book beside it on Fyers' Reports page is the more tempting of the two — it is only the trades that filled, at the price they filled at — and it is unusable, for a reason no parser can work around: it carries no instrument identifier at all. Its Name column holds the company, AVENUE SUPERMARTS LIMITED, where the Order Book holds NSE:DMART-EQ.
The Order Book's extra rows are not a drawback. It does list the orders that were cancelled or rejected and moved no shares, but only rows whose Status is Executed are imported, so there is nothing for you to prune first — and the Order Book is the only one of the two reports carrying a Status column for that filter to read. This is the layout the app's dedicated Fyers parser is written against:
Name,Date & Time,Side,Product type,Status,Order type,Qty,Traded price,Limit price,Source,Exchange order ID,OMS order ID
NSE:HDFCBANK-EQ,23-01-2024 12:41:51,BUY,CNC,Executed,LIMIT,10,"1,432.00","1,432.00",WEB,="1100000040500546",="250123000100001"
An Order Book CSV is recognised as Fyers and has its non-executed rows filtered out. A Trade Book CSV is not: its columns are different, so it falls through to the app's generic CSV reader, which maps the company name to the trading symbol. The import appears to succeed, but what you get is a holding called AVENUE SUPERMARTS LIMITED that corresponds to no instrument, reconciles against nothing and cannot be matched against your buys.
Generic CSV Format
For brokers without a specific parser, the app tries to match columns by name. Your CSV should have headers containing these keywords:
| Required Column | Accepted Header Names |
|---|---|
| Symbol | symbol, tradingsymbol, scrip, stock |
| Side (Buy/Sell) | side, buy_sell, transaction_type, type |
| Quantity | qty, quantity, traded_qty |
| Price | price, average_price, trade_price, rate |
| Date/Time | date, trade_time, order_time, timestamp |
Example:
symbol,side,quantity,price,date
HDFCBANK-EQ,BUY,10,1650.50,2026-01-23 09:45:06
RELIANCE-EQ,SELL,5,2450.00,2026-01-24 10:30:00
Tips:
- Column order doesn't matter — the app matches by header name
- Side must be "BUY" or "SELL" (case-insensitive)
- Date format: YYYY-MM-DD or YYYY-MM-DD HH:MM:SS
- Price should be per-share, not total trade value
What Gets Imported
Only executed trades are imported. The app skips:
- Cancelled or rejected orders
- Pending/open orders
- Rows with zero quantity or price
After import, a summary dialog shows:
- Trades parsed (successfully imported)
- Rows skipped (didn't match criteria)
- Warnings (partial data, format issues)
US Broker Exports
US stock accounts import the same way, from Import Statement on the US Stocks screen. Everything above still applies: only executed transactions are imported, and a transaction the account already holds is not added a second time, so re-importing a file is safe.
INDmoney reports Indian equity and US stocks as two separate files, so an INDmoney user needs both — the Indian equity statement above and the US report below.
Vested — Transaction History (XLSX)
Export from: Vested → your profile → Transactions → Transaction History, downloaded as XLSX. The file is an Excel workbook with a Trades sheet.
How to export from Vested (step by step) — sign in to Vested on the web, then:
- Click your profile, at the top right.

- Choose Transactions from the dropdown.
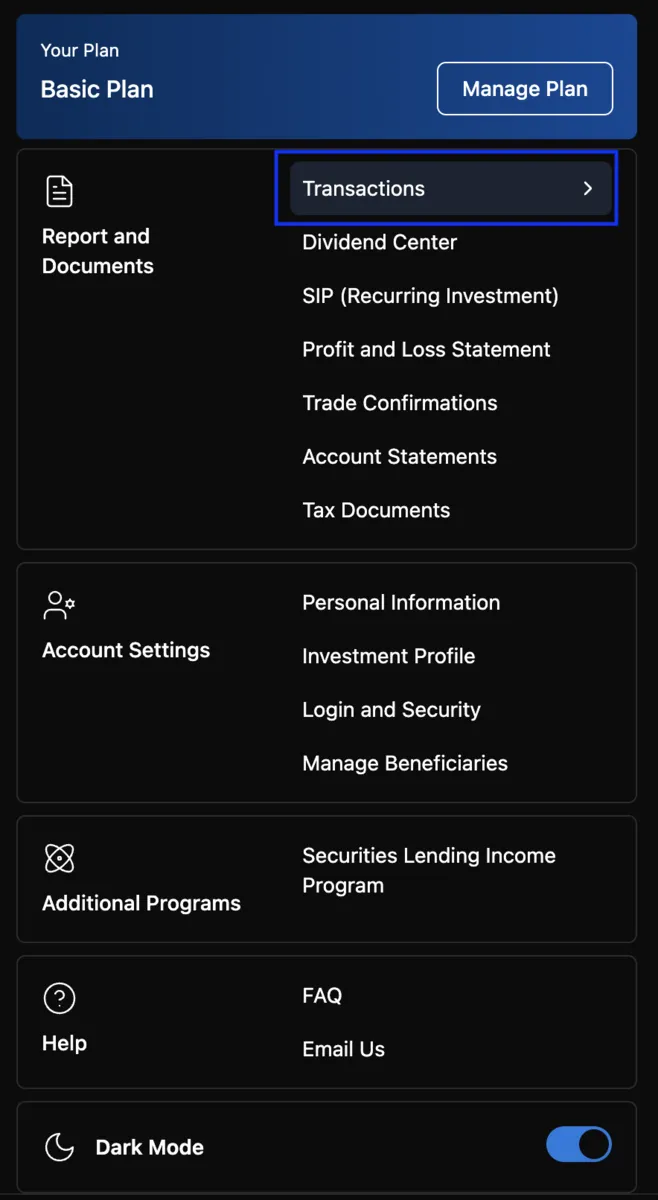
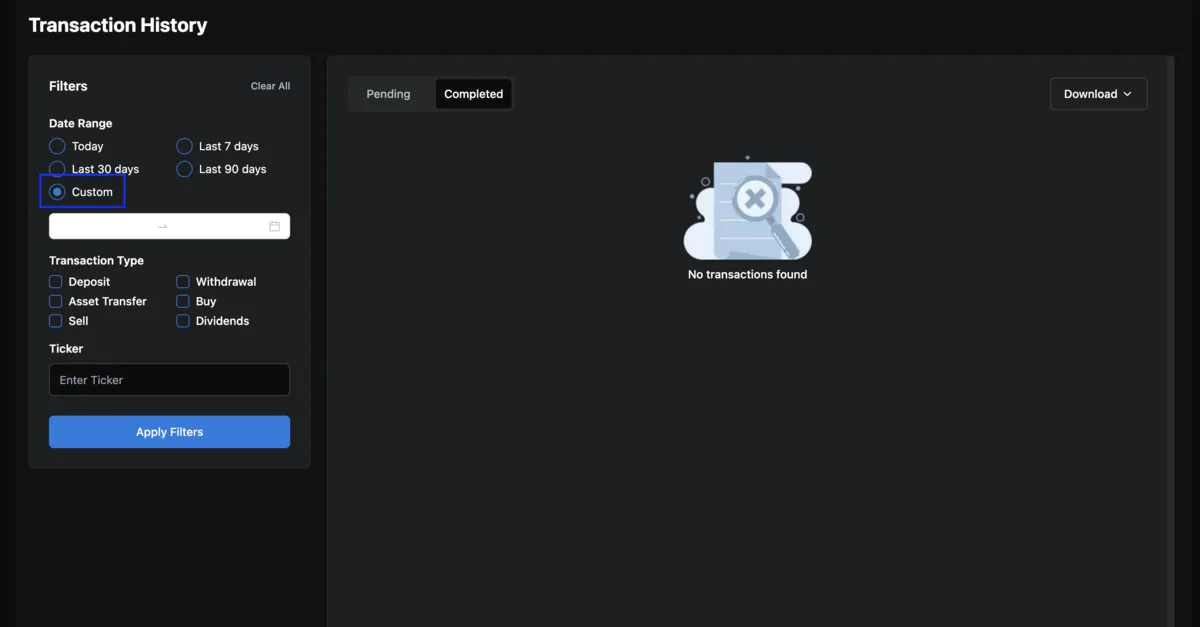
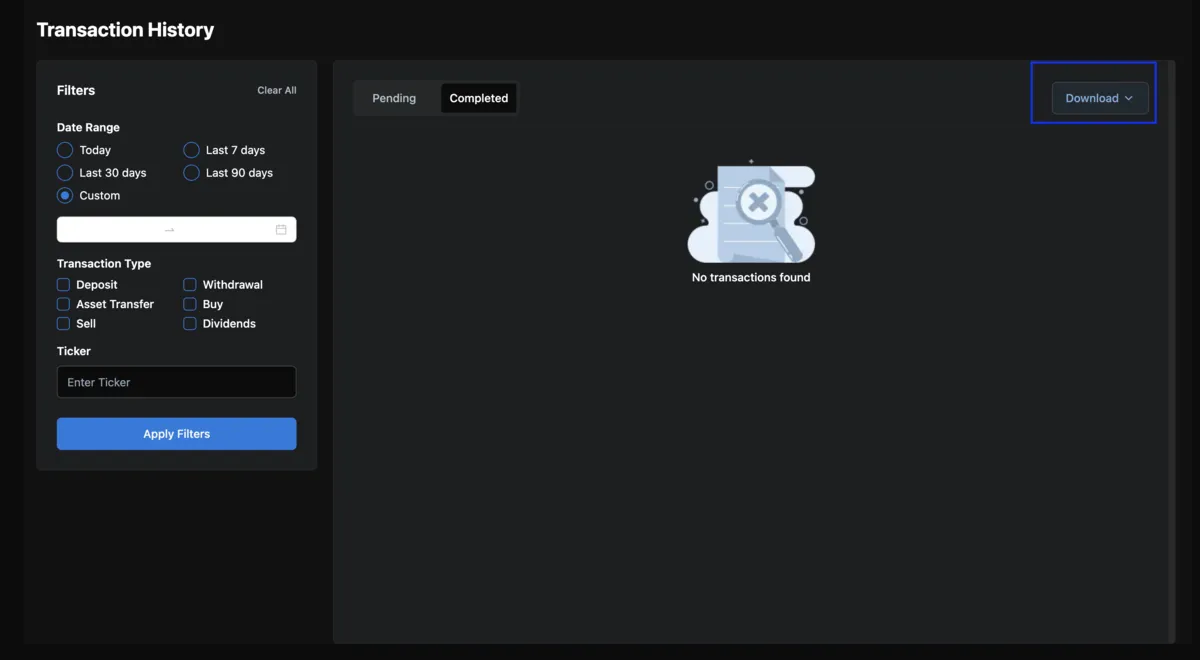
- On the Transaction History page, choose Custom under Date Range.
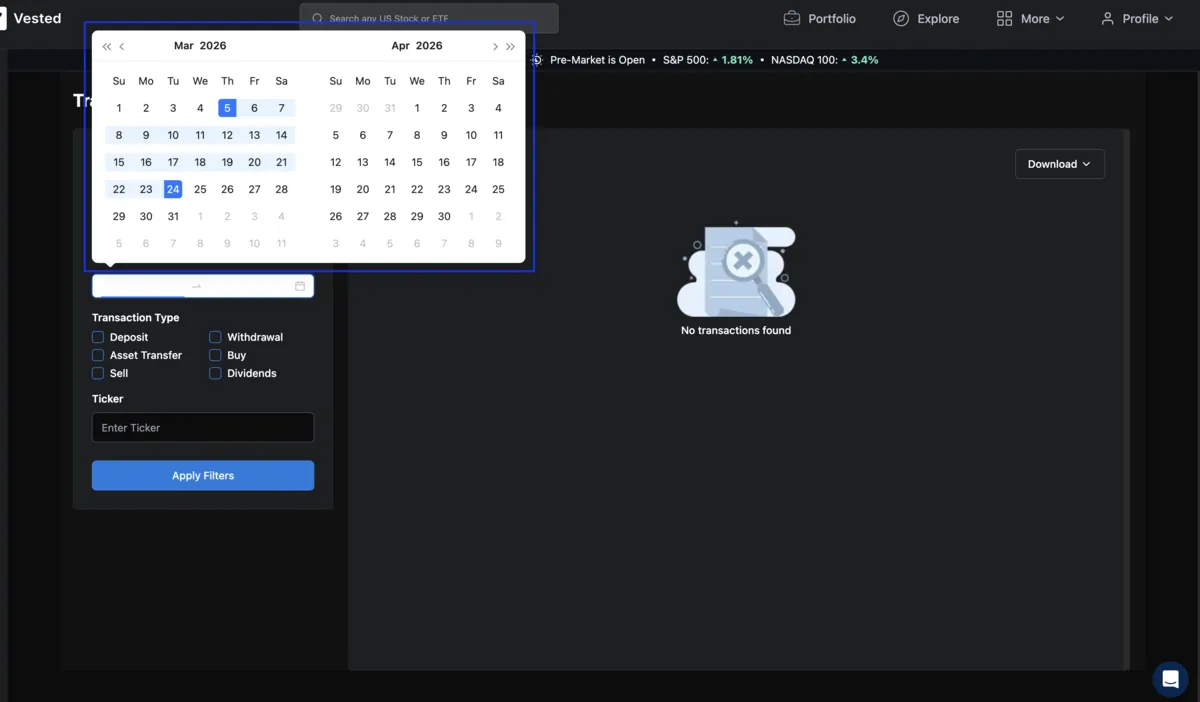
- In the calendar, choose the day you opened the account as the start date and today as the end date.
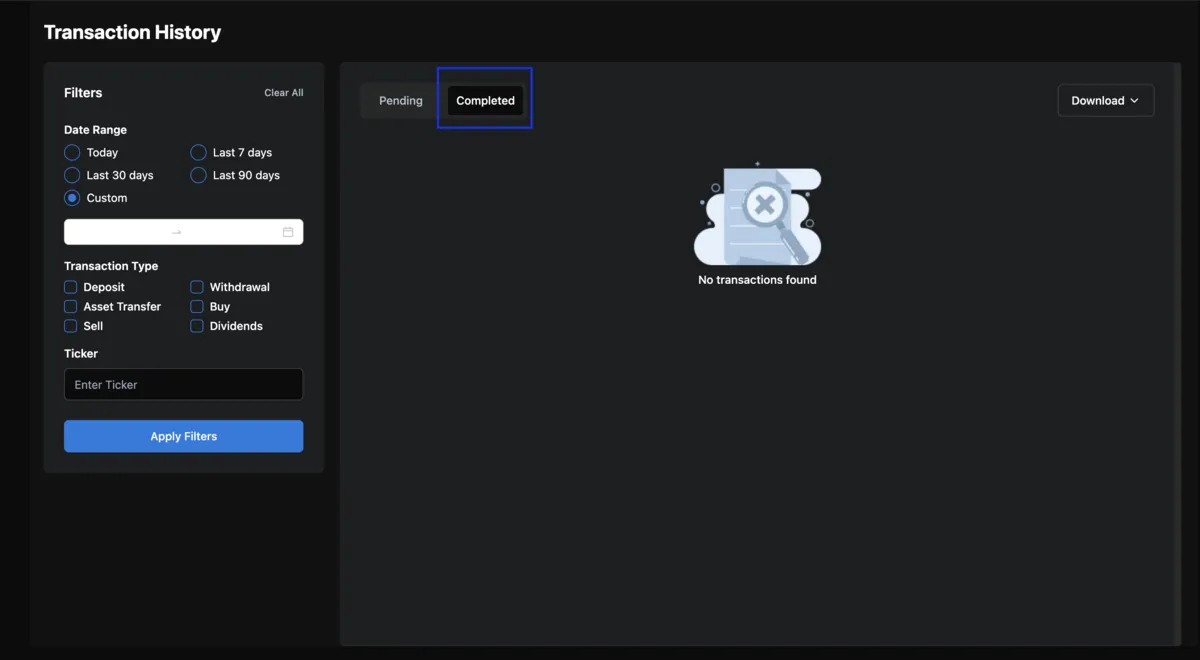
- Choose Completed, so the file holds only completed transactions.
- Click Download.
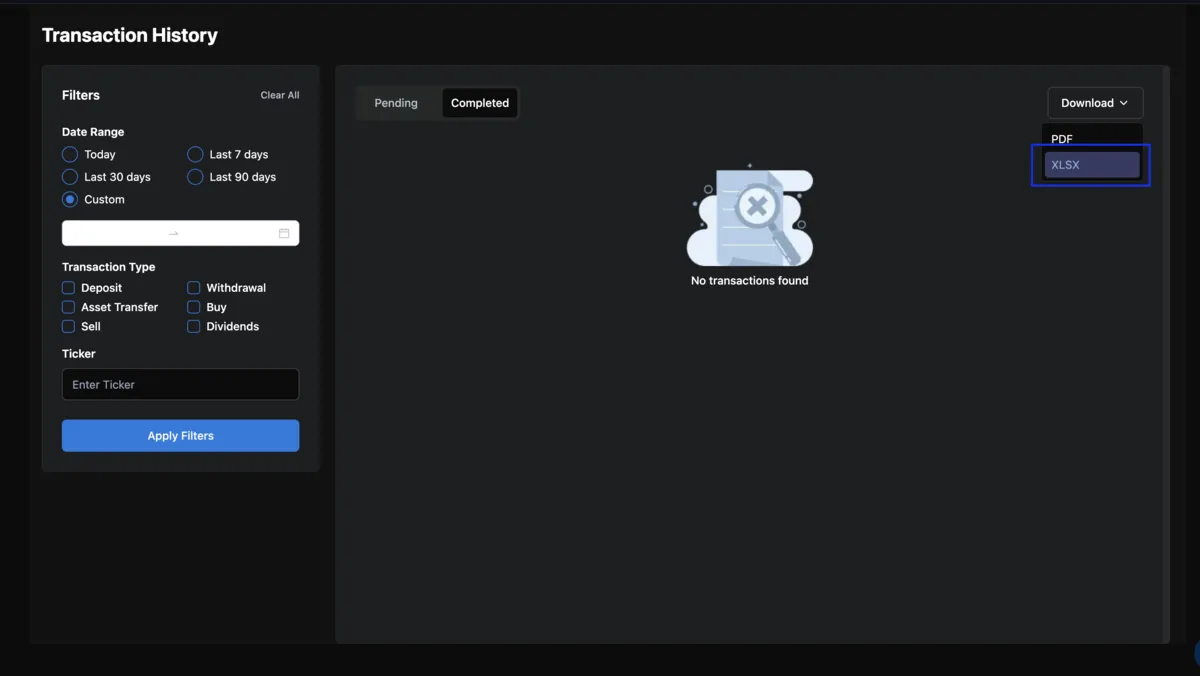
- Choose XLSX from the dropdown.
File details:
- The file needs its Trades section — the columns Date, Time, Name, Ticker, Activity, Quantity and Price
- Ranges may overlap. A transaction the account already holds is not added a second time, so a range covering trades you have already imported is safe
Start from the day you opened the account. A sale cannot be matched to a purchase that is not in the file, so a range that begins after your first buy leaves that holding with no cost.
This is the only Vested export the app reads. Vested also offers an account statement as a .pdf, and it cannot be imported: its transaction table gives a cash amount per transaction and no share quantity or price per share, so there is no way to tell how many shares a buy or sell moved. The XLSX carries both, along with the trade times, so same-day buys stay separate. Import a Vested PDF and the app says so rather than guessing.
INDmoney — US stocks transaction report (XLSX)
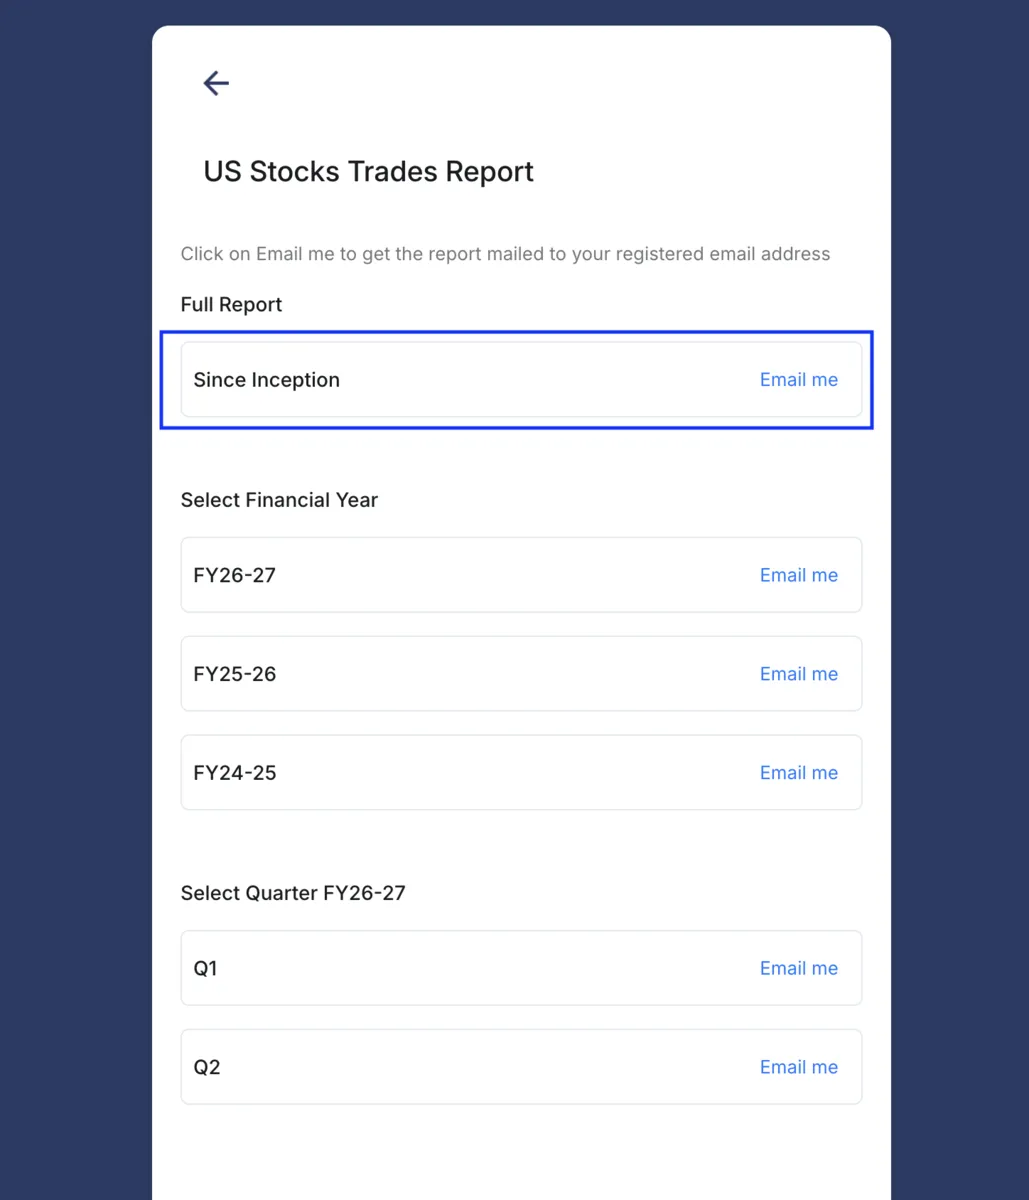
Export from: INDmoney → your profile → Tax and Other reports → Download Report → Other Reports → US Stocks → Transactions Report → Email Me. The file is an Excel workbook, .xlsx or .xls.
How to export from INDmoney (step by step):
- Click your profile, at the bottom of the left sidebar.

- Go to Tax and Other reports.
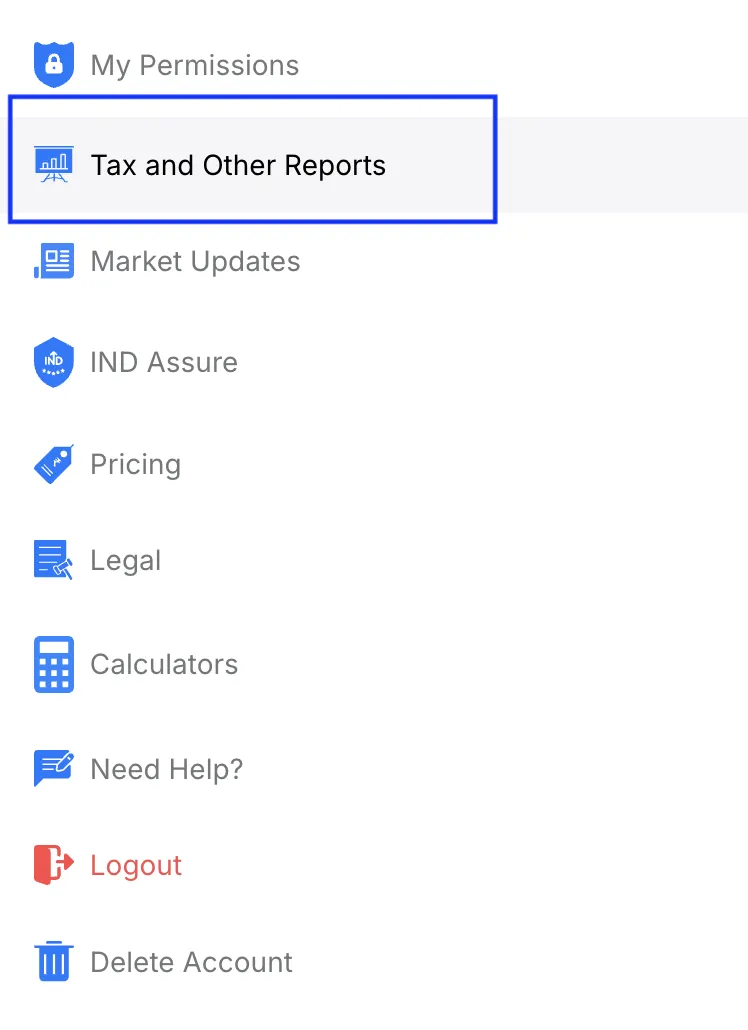
- Click Download Report.
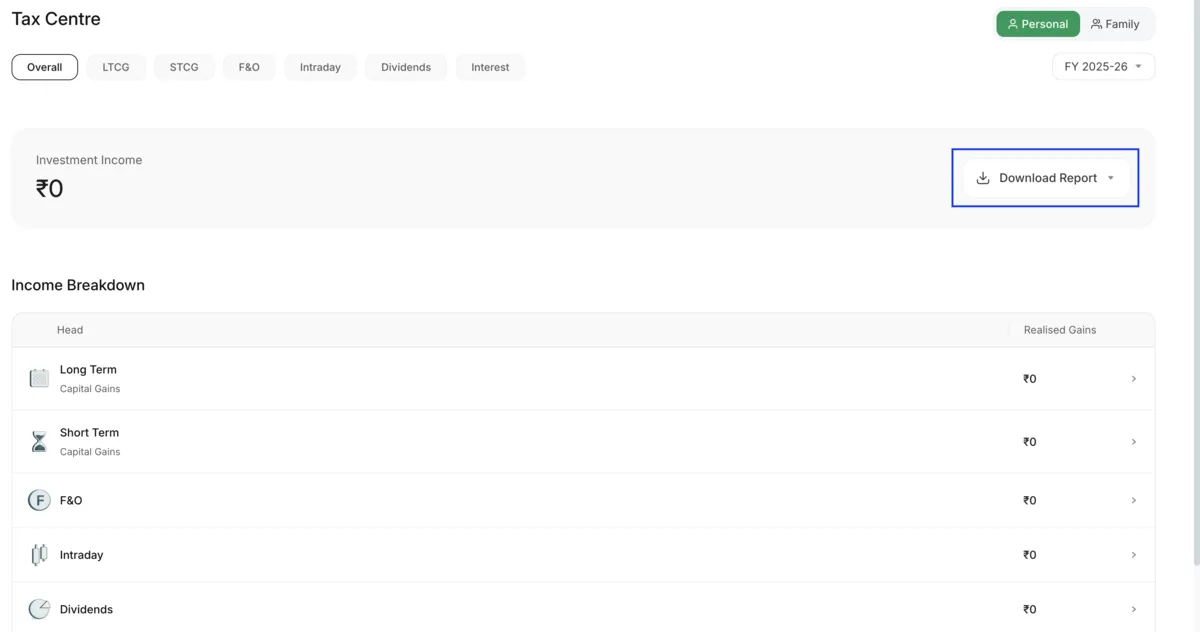
- Choose Other Reports from the dropdown.
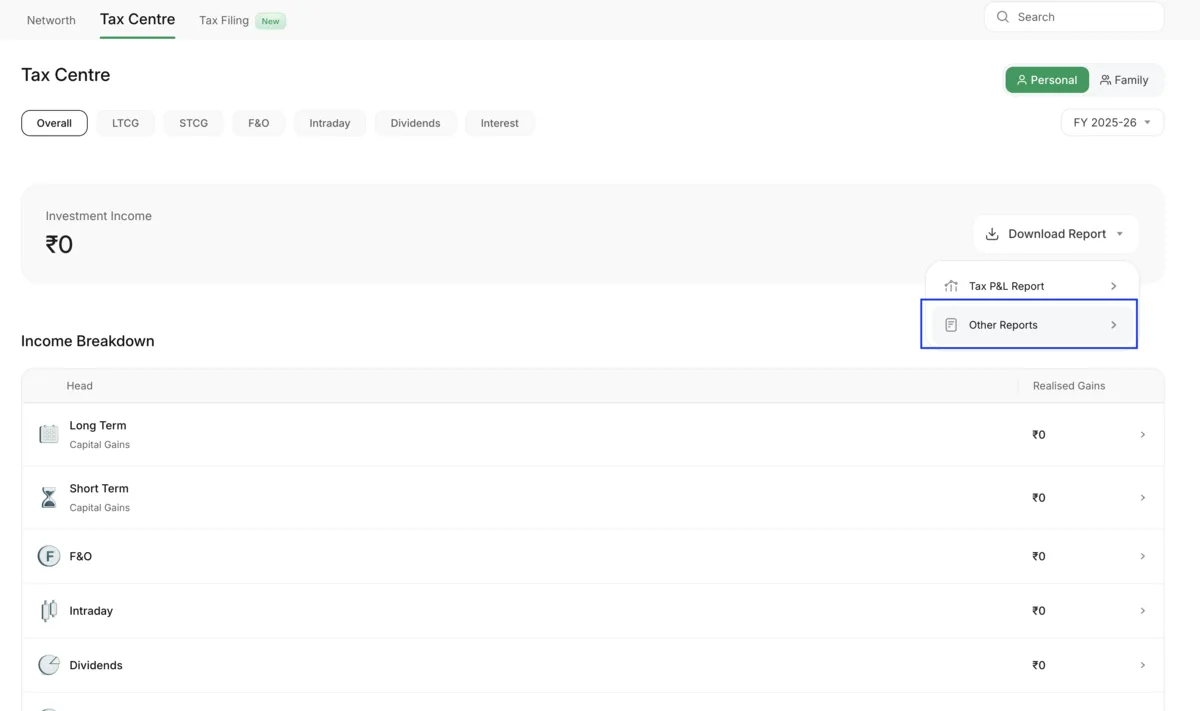
- Choose US Stocks.
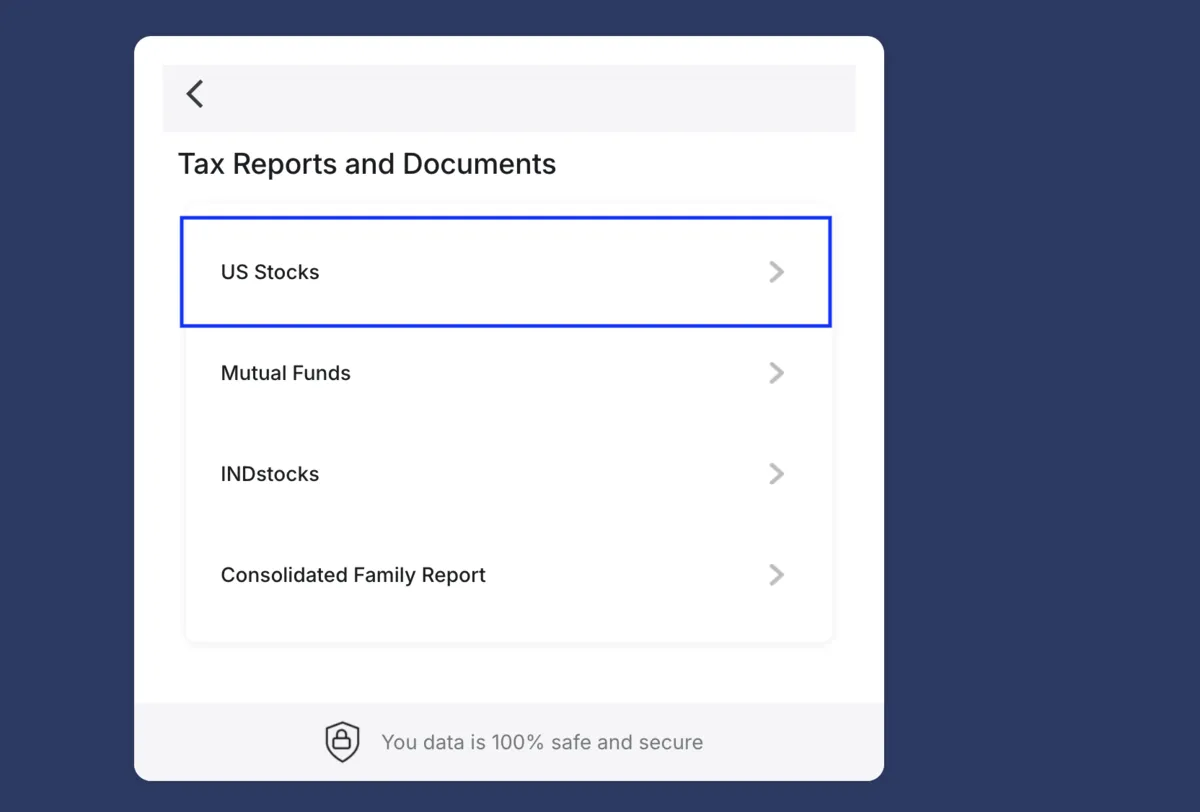
- Choose Transactions Report.
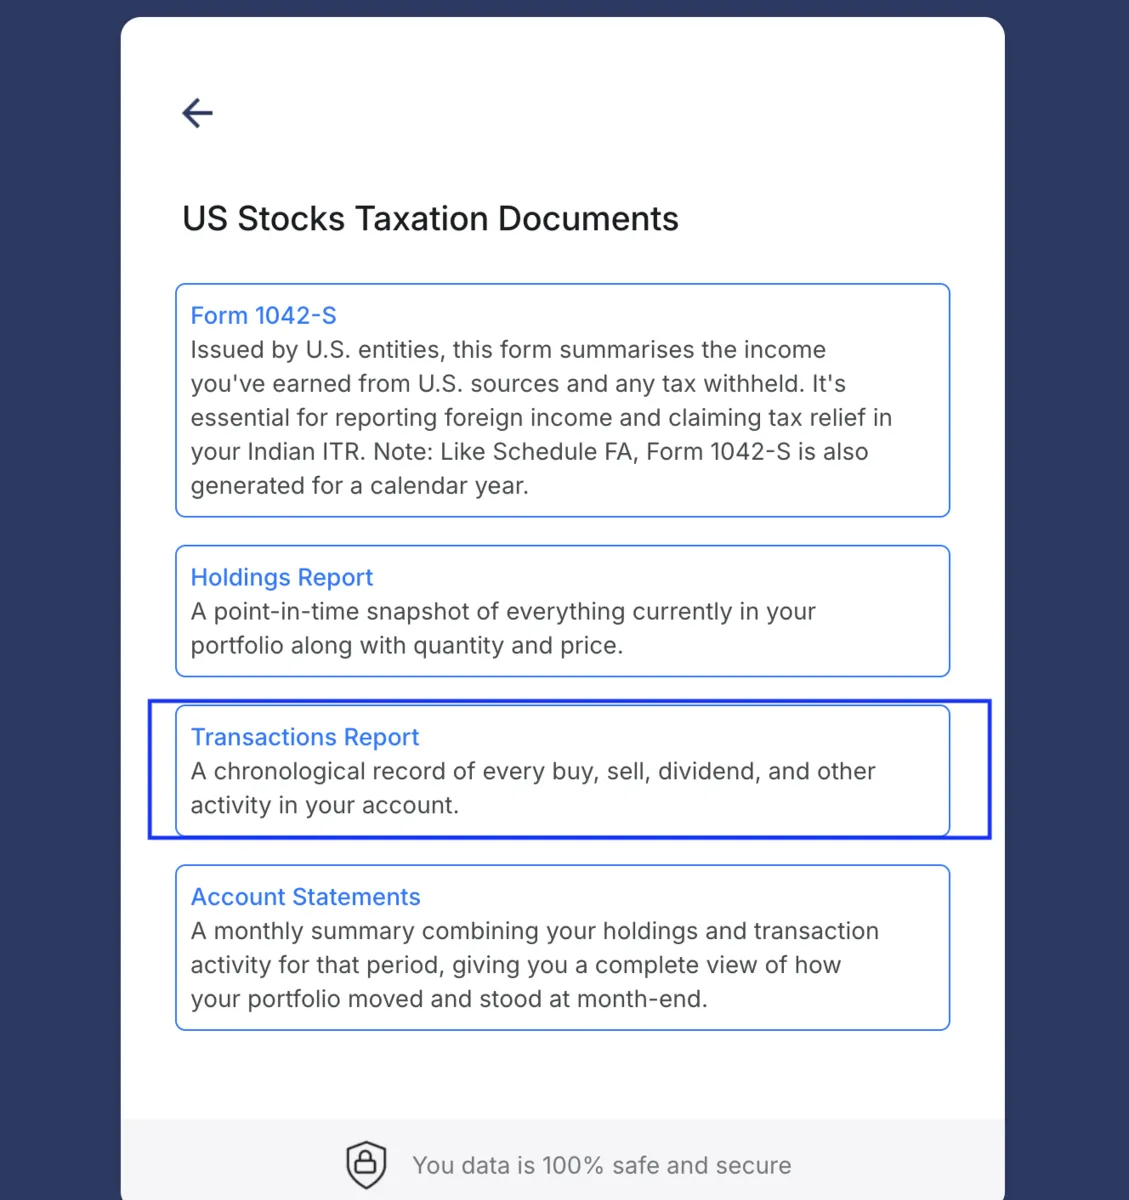
- Under Full Report Since Inception, click Email Me.
File details:
- The report must contain the transaction table — the columns Stock Name, Stock Symbol, Quantity, Price and Transaction Type. A holdings-only summary has no purchase history to read
- Either Excel format works — the older
.xlsdownload and the newer.xlsxboth import, with no need to convert the file first
The report arrives by email rather than downloading. Check the inbox for the address on your INDmoney account, then import the attachment here.
Take Full Report Since Inception. A report covering a shorter period omits the earlier buys, and a sale cannot be matched to a purchase that is not in the file.
Morgan Stanley at Work — View Savings Plan Fund Details (PDF)
Export from: Morgan Stanley at Work → Portfolio → Shares & Cash Holdings → Transaction View → the stock's details → Print or Save to PDF. The file is a .pdf of the plan's Fund Details page — the ESPP or savings-plan share holding, not the annual tax document.
How to export from Morgan Stanley at Work (step by step):
- Open the Morgan Stanley at Work account and click Portfolio, in the top menu.

- Under Portfolio, choose Shares & Cash Holdings.

- Click Transaction View, then click details beside the stock you hold.

- The Fund Details page opens. Click Print or Save to PDF, then import that PDF here.

File details:
- This is the ESPP share-holding page, not the annual tax document
- Use Print or Save to PDF, the page's own control, so the file carries the table as text. An image capture of the same page has nothing to read
- The holdings table is the position after any sales — its lots sum to the
Closing Valuein the Activity table. So the import reconstructs what you hold now, and past sales are not in it - Take the Fund Details page one stock at a time. The page covers a single plan and ticker, which is why the export names no security beyond its own header
Fidelity — View share details (CSV)
Export from: Fidelity NetBenefits → Summary → View Positions & Sell Shares → View share details → Current shares → Export. The file is a .csv of the lots you hold now.
How to export from Fidelity (step by step):
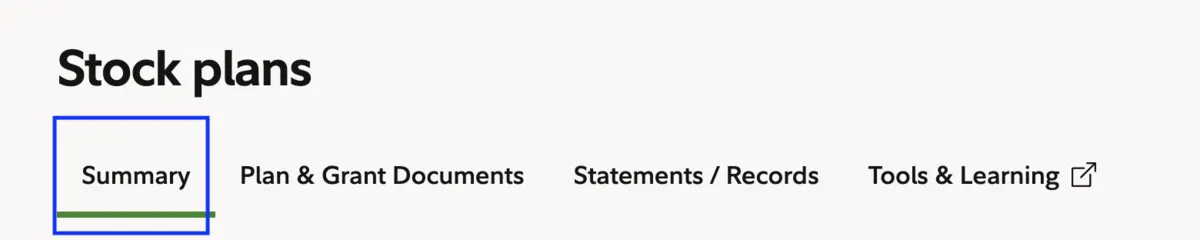
- Open the Fidelity account and click the Summary tab.
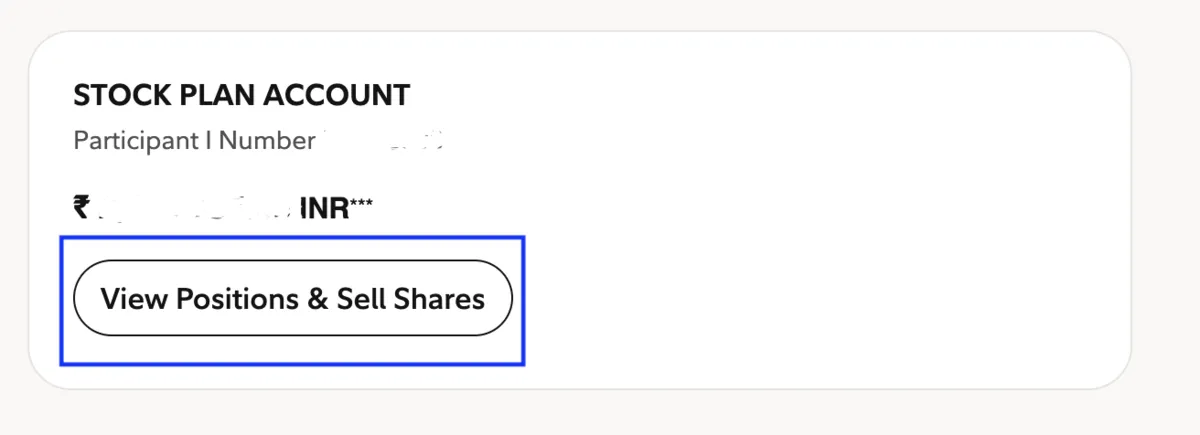
- Under Stock Plan Account, click View Positions & Sell Shares.
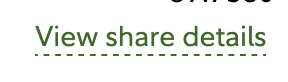
- Under the share quantity, click View share details.
- Under Current shares, click Export, then import the CSV it downloads here.

The app will ask you which ticker these lots belong to. This export never names the stock, so the app cannot work it out from the file. Import one CSV per ticker, and be ready to say which one it is.
File details:
- Export in USD. Fidelity can show a stock plan in your local currency, and the figures carry no currency marker, so the app reads them as dollars either way. A local-currency export imports a cost basis wrong by the exchange rate
- Current shares are current holdings only: shares you have already sold are not in the file, so it cannot reconstruct past sales
- The file names no security, which is why the app asks for the ticker — one CSV per ticker
Import Trade Cache File
Use this to restore a backup previously exported from this app. The file is a JSON document with a specific structure.
Expected Format
{
  "lastFetchedDate": "2026-05-25",
  "trades": [
    {
      "trade_id": "T123456_O789012",
      "order_id": "O789012",
      "exchange": "NSE",
      "tradingsymbol": "HDFCBANK-EQ",
      "product": "CNC",
      "average_price": 1650.50,
      "quantity": 10,
      "transaction_type": "BUY",
      "order_timestamp": "2026-01-23 09:45:06",
      "broker": "fyers"
    },
    {
      "trade_id": "T234567_O890123",
      "order_id": "O890123",
      "exchange": "NSE",
      "tradingsymbol": "RELIANCE-EQ",
      "product": "CNC",
      "average_price": 2450.00,
      "quantity": 5,
      "transaction_type": "SELL",
      "order_timestamp": "2026-01-24 10:30:00",
      "broker": "mstock"
    }
  ]
}
Required Fields Per Trade
| Field | Type | Description |
|---|---|---|
trade_id | String | Unique identifier for the trade |
tradingsymbol | String | Stock symbol (e.g., "HDFCBANK-EQ") |
quantity | Number | Number of shares |
average_price | Number | Price per share |
transaction_type | String | "BUY" or "SELL" |
order_timestamp | String | Date/time of trade |
Optional Fields
| Field | Type | Description |
|---|---|---|
order_id | String | Broker's order ID |
exchange | String | NSE, BSE, etc. |
product | String | CNC, MIS, NRML, etc. |
broker | String | Source broker name |
lastFetchedDate | String | YYYY-MM-DD of last API fetch |
When to Use Which
| Scenario | Use |
|---|---|
| First time setting up — want historical trades from broker | Import CSV Trades |
| Moving to a new phone — want all data from old phone | Export Trade Cache → Import Trade Cache |
| Adding trades from a broker that doesn't have API access | Import CSV Trades |
| Restoring from cloud backup | Restore Trades (in Cloud Backup section) |
| Merging trades from multiple CSV exports | Import CSV Trades (multiple times — deduplicates) |